Atomia Monday, February 13, 2012.
Provision services from the command line with Atomia
Even though Atomia comes out of the box with control panels to manage your services there might be times when using the command line to control Atomia is a better alternative. For this use case we have created a Command Line Client for use with Automation server (available as open source on Github). The client is written in Python and can be installed on most platforms.
The output of the client is in JSON format and to be able to easily filter relevant data from the output the examples in this article uses Jgrep which is a great tool for this purpose.
Provision a new website
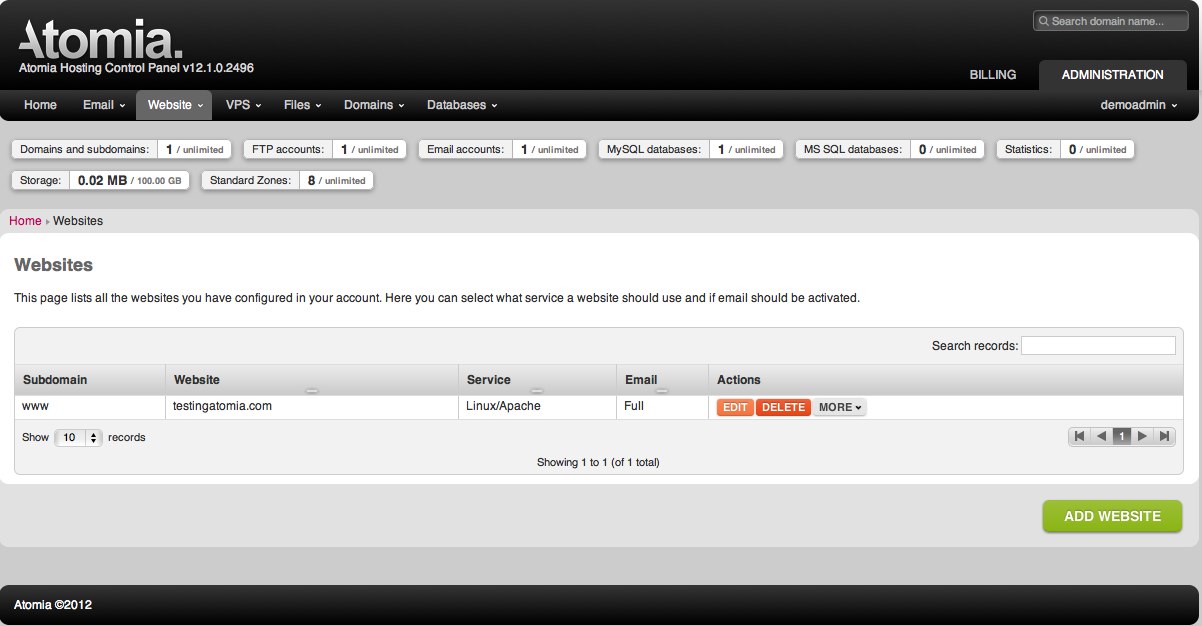
We will start with a simple example of how to add a new website to an existing Atomia installation, the website will be added on our Linux cluster with the hostname “testingatomia.com” and our account has id 123456.
Find the logical id of the CsBase service
Websites are added as a child service to CsBase, so in order to add our new website we need to find the logical identifier of the parent service. This can be done by executing the following command:
>> atomia service list --account 123456 |jgrep "name=CsBase" -s logical_id
>> a0281d3a-5f57-44a2-9d0d-e83f864c757a
All logical identifiers is GUID format.
Add a web site service
Now that we know the physical id of the base service we are ready to add a web site service. We will specify the parent service with the –parent flag and the basic information for our website within –servicedata. Note that input is expected to be in JSON format.
>> atomia service add --account 123456 --parent "a0281d3a-5f57-44a2-9d0d-e83f864c757a" --servicedata '{ "name" : "CsLinuxWebsite", "properties" : {"Hostname" : "testingatomia.com", "DomainPrefix" : "null", "DnsZone" : "testingatomia.com", "InfoEmailPassword" : "abcd1234"}}'
When the command is done you will get a JSON representation of the service you just added, Atomia will provision the website for you including email support ([email protected] will be created automatically with the password specified above).
The website we just added visible in the Hosting Control Panel
It really is that simple. The next example is a little more complex.
Provision a VPS in the cloud
In this example we will provision a new VPS from the command line. We will use the same account as above (123456).
Find the logical id of the CsCloud service
In the same way as websites VPS:s are added under a parent service (CsCloud). To find out the logical id we can use a similar command as in the previous example.
>> atomia service list --account 123456 |jgrep "name=CsCloud" -s logical_id
>> c82e0e29-41b2-4dd6-9af1-409bff13a545
Add a new key pair
In order to log in to our new VPS we need a key that Atomia will generate for us. We first get the identifier of the parent service (CsKeyPairs) and then create a new key par with this parent.
>> atomiaservice list --account 123456 --path  '[{ "CsCloud" : "c82e0e29-41b2-4dd6-9af1-409bff13a545" }]'|jgrep  "name=CsKeyPairs" -s logical_id
>> 2c2b3fd6-6da0-4d68-9ae8-f2b9475cb6c9
>> atomia service add --account 123456 --parent "2c2b3fd6-6da0-4d68-9ae8-f2b9475cb6c9" --servicedata '{"name" : "CsKeyPair", "properties" : {"Name" : "MyKeyPair"}}'
Provision the VPS
VPS services are provisioned under the parent service called CsInstances so we first need to find it’s logical id
>> atomia service list --account 123456 --path  '[{ "CsCloud" : "c82e0e29-41b2-4dd6-9af1-409bff13a545" }]'|jgrep  "name=CsInstances" -s logical_id
>> 66e9bc30-7210-4795-b1f6-f54e0a73ff84
Now we use this logical id to create the VPS.
>> atomia service add --account 123456 --parent "66e9bc30-7210-4795-b1f6-f54e0a73ff84" --servicedata '{"name" : "CsLinuxInstance", "properties" : {"Name" : "MyTestVPS", "Tags" : "Linux", "InstanceType" : "m1.tiny", "KeyPair" : "MyKeyPair", "ImageId" : "ami-00000002", "SecurityGroup" : "null"}}'
Most properties should be pretty self-explanatory, the SecurityGroup parameter can be used to set custom firewall rules, for this example we use the default rules that will add rules that opens the standard ports for a web server.

Now lets connect to our new server. To do this we need to fetch the key that we created for this VPS. This key can be downloaded from the control panel but I guess you are here for the command line so here is a one liner that fetches the key to your local computer and saves it as “mykey.pem”.
>> atomia.py service find --account 123456 --parent "c82e0e29-41b2-4dd6-9af1-409bff13a545" --query '{"name" : "CsKeyPair", "path" : "CsKeyPairs", "properties" : {"name" : "MyKeyPair"}}'|jgrep -s logical_id|xargs -J% atomia service find --account 123456 --parent % --query '{"name" : "EC2KeyPair"}'|jgrep --start properties name=Material -s prop_string_value >> mykey.pem && chmod 400 mykey.pem
Now that we have our key we need to know what hostname to connect to. Our environment is configured to provision services under the domain cloud.atomia.com, we can get the full hostname with the following query.
>> atomia service find --account 123456 --path '[{"CsInstances": "66e9bc30-7210-4795-b1f6-f54e0a73ff84"}, {"CsLinuxInstance" : {"Name": "MyTestVPS"} }]' --query '{"name" : "DnsZoneRecord", "path" : "DnsZone"}'|jgrep --start properties name=Label -s prop_string_value|awk  '{print $1".cloud.atomia.com"}'
>> i-000006f8.cloud.atomia.com
Connect!
>> ssh -i mykey.pem [email protected]

Summary
In these examples we show how to list and create services, however it is of course also possible to delete and modify all services, accounts and packages. The Command Line Tool can be a valuable asset in any Atomia administrators toolbox so check it out.