Atomia Friday, December 2, 2011.
How to create a NFS share on a Windows 2008 R2 server
We are currently working on a feature that will allow potential clients to download a trial of Atomia Cloud Hosting Platform and install it in their OpenStack cloud. This means we have to keep the size of the installation package as well as the footprint in their cloud (in terms of numbers of virtual machines) to a minimum. While a clustered productions environment may contain dozens of VMs we aim for a fully functional test environment with as few VMs as possible (currently 3, but we strive for 2).
Since we offer both Linux and Windows websites we need a storage solution that supports both SMB (Windows) and NFS (Linux). For production environments we recommend Nexenta ZFS, but for testing this is less suitable because it means that we would have to ship another image (and another VM is needed).
This can be avoided by exposing the NFS through Windows Server for NFS Services. While there are hundreds to tutorials regarding creating SMB shares, few are to be find about NFS Services. In Windows 2008 R2 there has been a number of changes and this blog post will guide you from start to finish on how to set it up.
Installing Server for NFS Services
To install Server for NFS Services simply execute this command:
ServerManagerCmd -install File-Services FS-NFS-Services
Setting up the User Mapping
This version of Server for NFS Services lacks the User Mapping server. The mapping is now done by Active Directory itself. But first a short explanation on what user mapping does: If you want to connect to the Windows NFS share from Linux, and you don’t use a common authentication scheme like Kerberos, Linux will identify the user to Windows using their user ID and group ID (which every user and group in Linux has). Run the following command in your Linux terminal to get the IDs:
less /etc/passwd
This is of course insecure because if an attacker controls a Linux machine of his own and connects to your NFS share he can simply pretend to be any user. Unlike among Windows machines it is not required for the Linux and the Windows user to share the same password. It is therefore important to control the access to the share via firewall or IP restrictions.
For the root you can choose for every share if it should be either considered anonymous or if it should be mapped to Administrator automatically. All unmapped users are covered by the entity Anonymous Logon in Windows. So you can save yourself the user mapping if you trust all users of the Linux machine, by granting rights to Anonymous Logon.
Run the following command on your Windows server to enable user mapping:
nfsadmin mapping localhost config adlookup=yes addomain=<yourdomain>
sc.exe stop NfsService
sc.exe start NfsService
Where the domain is given in its full DNS name.
To set up the mapping, let assume you found the line
ubuntu:x:1000:1000:Ubuntu,,,:/home/ubuntu:/bin/bash
in the passwd file. That means ubuntu is member of Ubuntu group and both have the ID 1000. To replicate that in windows you need to create a user ubuntu and a group we call g-ubuntu, but the name won’t matter.
MSDN has an excelent blog post with scripts on how to set the user and group ID
here.
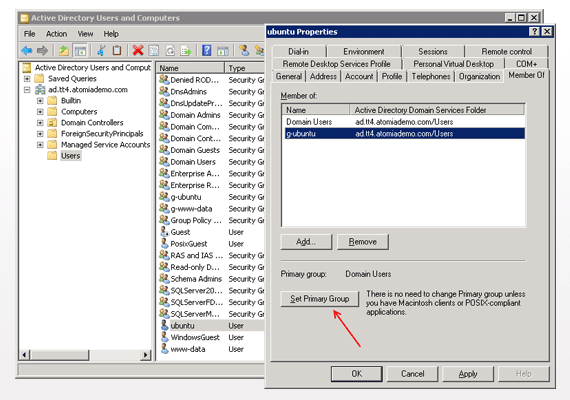
Unfortunately it does not cover how to set the default group. In Windows a user can be member of several groups, but in Linux it can be only one. To set the default group, you open Active Directory Users and Computers, navigate to the users account, right click, select Properties, select the Member of tab and then select the group and click on Set Primary Group.
The User properties dialog
Creating the share
To create an NFS share simply right-click on folder and select the NFS Sharing tab. You can activate NFS sharing there. The defaults are usually ok.
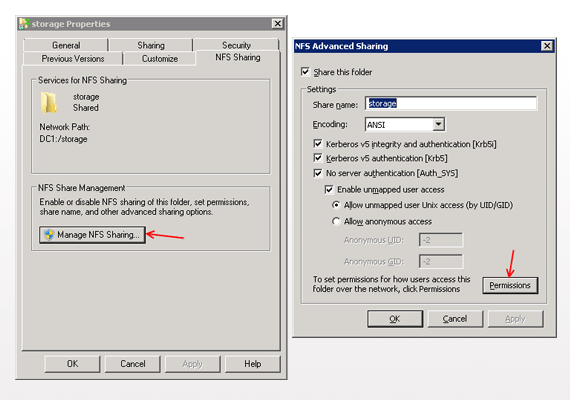 The NFS sharing dialog in Windows explorer
Then click on the Permissions button. By default all machines have read access. You should limit access to those machines that really need it. If you need that you can allow root access which means that the root user is given Administrative privileges.
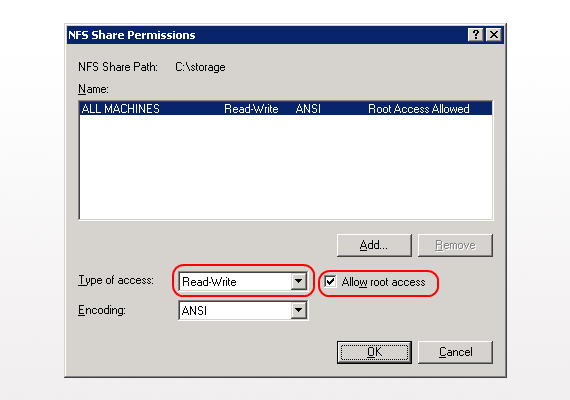 The permissions dialog for an NFS share
The NTFS permissions
The trickiest part are the NTFS permissions. Let’s say you want to give the user ubuntu access to a file. In that case you will probably add ubuntu to the users of that file and add permissions. But on the linux side this will change nothing. This is because Linux is only aware of three entities, the owner, the owner’s group and all. So when you give permissions this applies:
Use the Everyone entity in Windows to give permissions to all. To give permissions to a specific user or group you must first change the ownership of the folder to that group and then give explicitly permissions to that user or group.
To give ownership to a certain user/group it is best to use SetACL:
SetACL -on c:Storageb -ot file -actn setowner -ownr "n:ubuntu" -actn setgroup -grp "n:g-ubuntu" -rec cont_obj
To give the user and group explicit read and execute access use:
SetACL -on c:Storage -ot file -actn ace -ace "n:ubuntu;p:read_ex" -ace "n:g-ubuntu;p:read_ex" -actn rstchldrn -rst dacl
On the Linux side
On the Linux side you simply mount the NFS share
mount <IP>:/<name_of_the_share> /<mountpoint>
When the Server for NFS Services role service is installed it automatically opens the right ports in the Windows firewall.